We just finished spring break and we are already focused on working on our project. I believe we have about 50 days until sharing this game with the school. Of course the days I have to work are getting short. This is the time where I need to not only work on it during class, but as well as during school and possibly after-school. And I have been doing that. There is good progress on it since I have most of the windows in place. Really I just need to make sure the windows are in place and the walls are placed where it makes sense. But one thing I had to do was having to redo the walls in the outer ring. Because not only did it bring texture problems, but it made no sense to put it just one wall. Because there were other walls that needed to be placed to be correct, but if I were to move it or anything everything will move. Everything is going pretty good, I just need to make sure things are getting finished and are getting done.
|
The For this reflection we shall talk about the UVW mapping for, you guess it, textures! Oh how it helped me throughout this project, but I would love to take it further than just doing the basics. I would love to learn an easy way to do put on textures because it'll probably make the texture more realistic which is what I am aiming for. Since I plan on building up my skills to make sure I am comfortable in any position I am in for any project. I might even need to showcase skills and I would much rather have something rather than nothing. I actually found this website (www.gamasutra.com/view/feature/130484/uv_mapping_tips_and_tricks.php) that gives helpful explanations on the type of mapping and gives other options that I could use for texturing characters which is interesting. I think this would be helpful to learn in later times where I might have to create a character or even a prototype of a game. I can learn advanced things and I don't think it would be hard, but it depends. I thought that I have done one of them where you have the textures laid out and once you put it in the character with the UV mapping then it would fit. I remember doing that with models, which kind of scared me, but at the same time it interested me. I plan on using these techniques when doing anything really because you don't just want to drop the material to the object, that's just wrong on my account. I see it as cool when we have to make sure if it be planar or cylinder that it fits and there are different things that you need to consider like fro example you don't want to pick he box when it's a tree. You might want to put it in a cylinder instead. The one I actually want to research more is the Shrink Wrap because I don't really know what it is used for.
This week I haven't been working in textures as much I wanted to. I ran into a serious problem when having to send over the on working model of the whole building. I had to send only the 1st floor, but I sent the whole building. Once my team-mate opened it up in Unity, he told me everything that was wrong and well one of them was the scaling of the floor. Another problem that he had was the it didn't lined up with the blue print, but for that i said that it doesn't have to be the perfect line-up because I know for sure that even when having a blueprint of the school I know it might all be perfect. I see it as if constructors build a house they are allowed to shifted somethings and well 3d modeling can be the same. But either way once I looked back at the model I had noticed that it wasn't adding up. I had thought that everything was at place, but it wasn't! I was confused. So I haven't gotten to texture most of the building, which is making the progress longer. Of course what I need to do is just make sure I just finish the model as a whole in order to texture everything and be done. So that the model can be done and I can texture without having to do anything else. Since there are other things that I need to do that involves students artwork. Agenda for Next Week-
 Building- Julia Serrano & Abigail Stover 3DS Max 3/16/19 W e are still in the 3ds Max trying to finish the whole building. But one thing I'm also doing is going into Adobe Photoshop to fix the textures. One thing that I think I will know are of course, the basics. I have worked in Photoshop, but I am not a pro or whatsoever. I still remember the time I first touched or even opened Adobe Photoshop, I was shocked, but amazed. I really didn't know what I was doing. I even remember doing this test on if I knew how to work in Photoshop. What I had to do was manipulate what my teacher made and I failed terribly. But I wish to know some tricks that could help me with fixing up the textures or even to do other projects. I found this website where it shows me some things that beginners can do, www.makeuseof.com/tag/introductory-photoshop-skills-for-the-beginning-photographer/. One thing I know I will be using is having to remove certain objects in the picture. But then again it would be helpful anyways when I'm working on something else. And there are many other tools you can use when removing something in the picture. I feel as though I need to try them all out so that I could see which ones does it best for whichever one. What I thought was cool was having to add a frame to the picture in a very different way that what I though of doing. I think that's cool to do when maybe putting a student's artwork in a game....and then putting the credits on that as well. Just an idea.
It's been a week into March and I saw I mostly have everything for textures, but I might have to fix some of them. The pictures are somewhat different than the rest, but I'll probably just have to use UVW mapping and get in Adobe Photoshop. Which leaves me to pull back my skills in Photoshop. It does help, somewhat, to do back and touch things up and then putting it was a bitmap in 3ds Max. Of course this also means that I am closer to hitting the big textures and then moving on to the smaller detailed ones. I'll have to ask what I need to put for the boards outside in the halls. One idea that I have is actually having to put the four of us on them. Or what we could also do is put more student artwork on them as a jpeg. Pretty much will move on to other models since I'm done with the bathroom. The other thing is that I started to do the windows upon the rooms that have one, which is most of them to be completely honest. And then once I have some of those done I might just do the exterior texture as well. The texture is mostly bricks which should be easy enough. In reality I would probably need a few weeks to fix the textures and put them in the models that need that. There are many other things I need to do but for now I need to get the textures done as much as I can. Agenda for Next Week-
During this final week of February I have been solely working on the model and texturing. The bathrooms are nearly finished there's just the walls that I need to texture as well as the floor. There's also the things inside the bathrooms, which I mostly got done with all they need are mirrors, but the thing is, is that I just send the models to the programmer and let them take the lead to put somethings in place. To be completely honest I think I might a bit faster than before on making models. Of course I'm no pro and there is always room for improvement. But I know deep down I can't keep afford to do absolutely everything since I don't think that there needs to be the exact number of cylinders on the top. I would love to see what the textures look like in VR, but I would have to put everything in before. So during this week I will be taking lots of pictures for textures. And I will also will be paying more attention to the details of the building because I will tell you I totally forgot that there are different color walls around the building. And we are in March! I really need to hustle up and push forward. Agenda for this Week-
You can do many thing in 3ds Max. And there's many interactions that you can do within. Shortcuts to be discovered, meaning easier ways to make models. To be honest I was looking through the news and I was this website and I thought it would be interesting because it was titled "Interactive Tools for 3ds Max" 80.lv/articles/interactive-tools-for-3ds-max/. Sounds great right? Well I took a look at it and I saw that there are some interesting controls for let's say chamfer or doing the interactive symmetry modifier. And to be honest the interactive symmetry modifier looks really cool and I really think that it could help me doing some cool artwork in the game. Of course I would also use that to do some cool artwork of my own. Although there are a lot of keys to help you out, I think you really just need some of them. With this I could learn more shortcuts in 3ds Max and maybe be a professional in 3ds Max because I do plan on having my portfolio include 3d models and some 2d artwork. The reason I'm talking about this is because I'm trying to figure how to save some time by not having to move the mouse so much to the point where I need to do all the time. Because there are somethings that I would have to go back and forth. Of course, you might just have to do it by hand or by copying it, but there are some problems to that. I really glad I found this because now I can play around and make sure I know what keys I can press to change the number of segments or have to bevel the shape into something else.
During this week I have been doing both modeling and texturing. And really the only things I have been creating are details in the building it's self. I think I've been making the best process as possible. The things that went well this week is having to create the sink, toilet, desk and creating the textures for them. But of course those are the small things that will come a long way. One thing that I really want to focus on though are the bigger things though. For example the walls. Now some of the walls are connected, which means that if I were to put a texture on it then it would just be that texture only. We don't want that because some of the walls are different from the bottom and top. There's even some that changes in color, but is the same type of texture. Don't even get me started with the stairs. I don't know why I didn't think about this before, but I will probably need to physical make the stairs instead of having them being made by the AEC objects. Because once I did texture it, it just didn't look right. So really what I though of doing is making the stairs (with a low-poly of course). I'll probably have to figure that out in order to make it seem realistic, since that's what we are going for. I'm thinking of doing somewhat of the same thing with the walls as well. Either way everything is going pretty well, really I need to be more faster on doing this. Agenda for Next Week-
So far during the week everything has actually been going pretty well. Some of the things that has been going well is having the textures going well for the models. Some of the textures are actually made by me, which is pretty cool. I have been starting making the little things that make up the school, like the desks, toilets, etc. And I have been making/putting in the textures for them as well. In the last post I said that I had trouble with positioning the texture to the right place although that helps me a bunch there's one thing I know I will have trouble doing. Which is texturing the stairs and even the walls. I'm having problems having to make it right and to not make it look like it's stretched. I probably have to make a new texture of it to make it seem okay. Although I'm not too sure about how I'll do that. I think what I'll do is actually have planes over them. Second thing I'll probably try is do a simpler (low poly) stair than what I have and texture them separately. And so for the walls what I'm thinking is that I will cut them where ever I need them to be cut and texture them from there. Also since the walls inside will be different from the outside I'll just put a plane over it and call it a day. But everything else is going pretty good. It's going along to the point where the building is almost complete....at least somewhat. Agenda for Next Week-
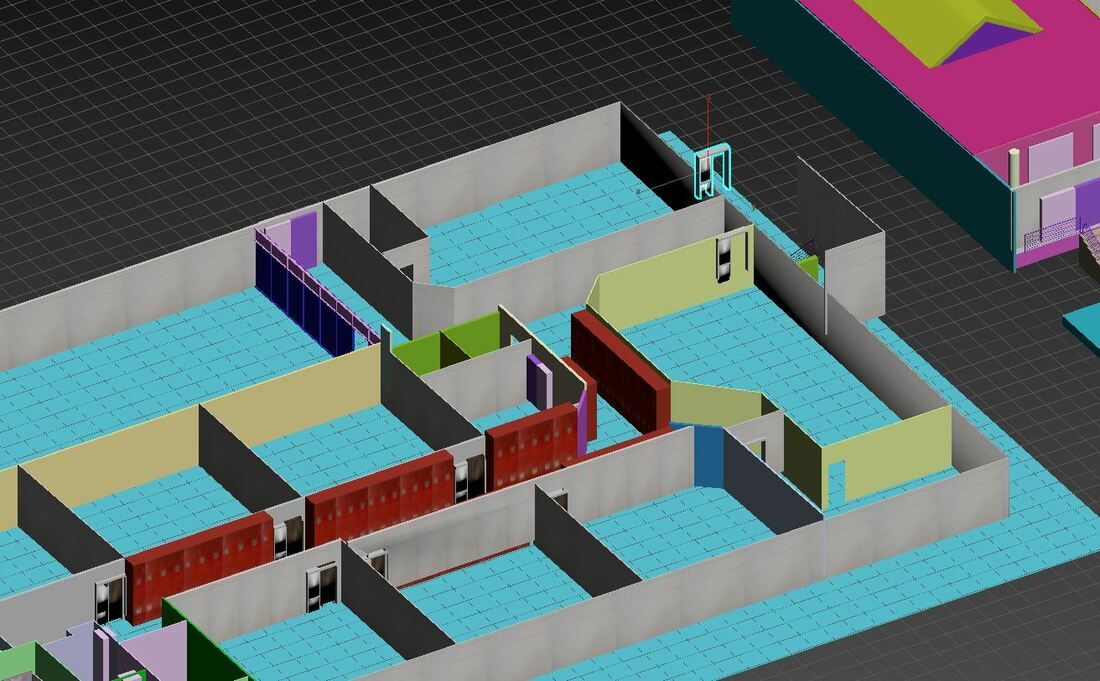
As we get closer and closer to May, my stress and anxiety goes up. But the good thing is that the work is getting done as well. I think right now it's time for a reality check and see what I need to do verses what I want to do. At first what we wanted is to do the whole school, but sadly that isn't possible. At least in my ability. The only thing I am modeling is the building with the Atrium. It's going very well I believe. If you were to take that model and give it to a student or teacher they might say that it does look like the atrium or a class. And we can easily turn that model into a little sneak peer inside DSA as like a tour on the website. Not bad I say, but I also have been texturing lockers, walls, etc. To be honest with you I ran into the problem of not remembering how to texture objects in 3ds Max. Disappointing I know, but with the help of the internet I remembered how to. One thing though I want to explore is having to fiddle with the other materials when texturing, but I'll talk about that in a reflection. But my problem didn't disappear there. I also forgot how to change the position of that texture, which meant that the lockers were not looking hot. At first I though that I knew, but nothing I did was working. But of course I had to go to the modifier list and go all the way down to UVW map. And that did the trick. For right now that's the only thing I am working on: Putting details while adding textures. But of course, I need to as well make more textures for other models.
Agenda for Next Week-
|
Note:The views and opinions expressed in these blogs are solely those of the author and do not represent those of Durham School of the Arts or Durham Public Schools.
AuthorWelcome to my blog page! I am a Senior and I'm in CTE Advanced Studies. This is where I tell you information upon myself and information about certain elements in the gaming industry. Archives
May 2019
Categories
All
|
 RSS Feed
